Friday, March 31, 2023

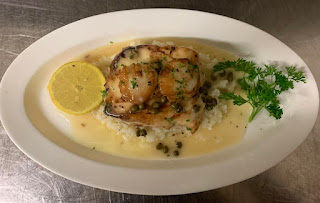
Scallops with potatoes and olives 


Scallops can reach 15 cm in diameter. They live in waters that are not too salty, with sandy or muddy bottoms, rich in debris. Ideal habitat are for example the mouths of rivers. They move on the bottom by opening and closing the valves, taking advantage of the thrust from the expelled water, and the shell is marked by 16 very deep ribs, like a comb. Due to its size and shape, the lower valve, the one that rests on the bottom, is often used as a container to gratin shellfish in the oven or to serve fish salads. Of the scallop the muscle and coral are eaten because the alveola, although edible, is too full of sand and therefore must be eliminated. On the market there are both whole shells (they must be alive!), and only nuts, fresh or frozen. To make the recipe that I propose I used frozen scallop nuts.

 Ingredients

8 scallop nuts 
200 g potatoes
olives to taste
1 knob lactose-free butter
extra virgin olive oil to taste
salt to taste
pepper to taste
150 g seed oil
8 strands chives

Preparation 

Heat the seed oil in a saucepan, bring it to the point of smoke (220 C degrees) and fry the potatoes. Place them on absorbent paper and leave them in part. Leave them warm. Brown the scallops in a hot pan greased with a drizzle of extra virgin olive oil (about 30 seconds per side) and season with salt. Prepare the dish by placing the puree on the bottom. Place a scallop on and, if the scallops are small as in my case, place a few more scallops over the cream. Garnish with crispy potato chips and a couple of strands of chives and olives.


Lamb with onions and mushrooms 


I love this second course, it is of a unique simplicity and always conquers everyone on the table. Lamb with mixed mushrooms, you can prepare it as I did in the pan very quickly. I preferred to use the cut of boneless leg, cut by the butcher into slices a little thick so as to remain tender and succulent at the end of cooking... The lamb with mushrooms and onions is prepared by browning the meat while blending the vegetables and then frying in the same pan as the meat. Discover all the steps to prepare the recipe of lamb with mushrooms and onions.

Ingredients

750 g boneless leg of lamb
1 small onion
1 carrot
300 g frozen mixed mushrooms
2 tablespoons extra virgin olive oil
1 sprig of rosemary
salt

Preparation

Check the meat carefully in order to eliminate any residues left at the time of cutting then dry it well with absorbent paper. In a large pan, heat the extra virgin olive oil, add the carrot with the onion cut into small pieces. Mix and season with a sprig of rosemary. At this point, add the pulp of boneless leg of lamb. Let the meat seal evenly, salt and cover with a lid. After the first twenty minutes of cooking, add the frozen mixed mushrooms, cover again and cook. Serve the lamb with mushrooms in a hot pan perhaps accompanied by boiled potatoes or a good mashed puree.


Halibut and Scallops 


Scallops, with only 3.2 grams of net carbs per 100g, conforms to the ketogenic diet. Always include fish in your diet to have excellent sources of protein and polyunsaturated fats. Learn how to bake halibut that's tender, flaky, and super fast! This easy baked halibut recipe has lots of flavor, yet simple ingredients. Once you learn how to bake halibut with lots of fresh herbs and seasonings, you’ll want to make it a regular in your dinner rotation.

The scallops with wine are a quick appetizer to prepare but with a refined and very nice result to bring to the table even and especially on the most elegant and special occasions. Let's see together how to prepare them and some useful tips for a truly perfect result. Scallops with wine are a very refined and hearty appetizer although it is prepared in a short time and very few ingredients are needed. The result, however, is really very beautiful and spectacular to bring to the table and will amaze your guests. Let's see, then, together how to prepare excellent scallops with wine.

INGREDIENTS

4 5-oz Halibut fillets
1/4 cup Olive oil
2 tsp Fresh dill (chopped)
2 tsp Fresh parsley (chopped)
2 tsp Fresh chives (chopped)
1/2 tsp Paprika
1 tbsp Lemon juice (from 1/2 a lemon)
1 tsp Lemon zest (from 1 lemon)
2 cloves Garlic (minced)
1 tsp Sea salt
1/4 tsp Black pepper

INSTRUCTIONS

Preheat the oven to 400 degrees F (204 degrees C). In a small bowl, whisk together olive oil, dill, parsley, chives, paprika, lemon juice, lemon zest, and garlic. Arrange the halibut fillets in a stoneware baking dish, with space between them. Use paper towels to pat them dry. Brush the fish on both sides with the olive oil mixture. Season both sides with sea salt and black pepper. (You can also mix the salt and pepper into the olive oil mixture before brushing, but they disperse more evenly if you sprinkle separately.) Bake for 8-15 minutes (depending on thickness), until the halibut internal temperature reaches your desired doneness: 125 degrees F (52 degrees C) for medium rare, 130 degrees F (54 degrees C) for medium, or 140 degrees F (60 degrees C) for well done. I recommend medium for the most tender, moist, and flaky fish. If you don’t have a thermometer, you can check that the fish flakes easily with a fork, but is still moist and tender inside.

Ingredients

4 scallops
juice of half a lemon
1/2 glass of white wine
parsley to taste
extra virgin olive oil to taste
pepper to taste

Preparation

To start the preparation of scallops with wine you have to start from the scallops. These, in fact, will be washed well and detached from their shells, but they will be kept aside because they will constitute the container in which you will serve them to your guests. In this way you will make your wine scallops even more beautiful and spectacular to bring to the table. Once this is done, dedicate yourself to the lemon from which you will have to extract the juice, which will then be filtered so as to eliminate any pulp residues. In this way you will get a perfectly smooth lemon juice. As a last preparation dedicate yourself to parsley, which you will have to chop very finely, keeping aside a few tufts for the decoration of your scallops with wine. At this point take a pan and heat a drizzle of extra virgin olive oil. When this is hot, add the scallops and scald them on both sides for a few minutes. The cooking times of the scallops are very important to prevent the fish from becoming stringy and chewy. Deglaze with white wine and pour lemon juice to flavor the scallops well in wine during their cooking. After a few minutes as soon as the scallops are ready to be served so resume their tastes and lay each scallop inside its shell, accompanying it with a little cooking liquid and sprinkle with a handful of chopped parsley, which you have prepared before. The scallops with wine are then ready to be brought to the table to your guests hot.

Tip
You can flour the scallops before putting them in the pan. In this way not only will a very delicious, but above all during cooking a cream will form on the bottom, which will be very delicious and will enrich even more the flavor of your scallops with wine.


Mussels with bread


The sautéed mussels is a delicious dish that contains all the wonderful flavor of the sea. In this recipe a few simple ingredients will give life to a really succulent stew that will enhance the intense and marine flavor of the mussels. The term sauté (of French origin) refers to a particular cooking technique in which food is simply sautéed in a pan over high heat. This recipe is prepared in a few minutes and the result will be really special. Mussels, spring onion and cherry tomatoes will be embellished with spicy, aromatic and acidulous notes of Tabasco giving the palate a real explosion of flavors. Prepare this special sauté of mussels ... Delicious fried bread croutons will be the perfect accompaniment to collect and enhance all the delicious sauce. Flavor, sweetness, acidity, crunchiness will peep out making your taste buds vibrate!

Excellent as an appetizer and as a second course, to be accompanied with the classic slices of toasted crispy bread. You just have to get fresh mussels. Thanks to the high content of omega-3 fatty acids, mussels are a formidable ally to counteract cardiovascular risks. 

Eating mussels three times a week can lead to significant health benefits, such as a reduced risk of cardiac arrest, due to their omega-3 fatty acid properties. Early research results, conducted by experts at the University of Stirling, found that adding shellfish to diets over a two-week period "significantly improved" omega-3 status.

The research project, which involved 15 participants, sought to find ways to improve essential fatty acid intake in the general population. He found that mussels provide a viable source of omega-3s that can supplement existing alternatives, such as fatty fish. Dr Stefano Carboni, from the University's Institute of Aquaculture, who led the research, said: "Although involving only a small sample size, through this study, we have shown for the first time that when mussels are consumed during lunch meals, omega-3 status is significantly improved."

"We know that omega-3s have a number of health benefits, and although it is recommended that people eat at least one serving of fatty fish per week, less than 20 percent of the population achieves this goal, and therefore does not consume the required levels of these essential fatty acids."

"Current evidence also suggests that omega-3s in the world's fish stocks are insufficient to meet the population's daily needs, so it is essential to explore alternative food sources."

The research, believed to be the first to explore the impact of mussel consumption on increasing omega-3 levels, saw participants consume fish three times a week for 14 days. Blood samples were taken from those involved and subsequently analyzed to measure the relative concentration of essential omega-3s during and after the study. Increased consumption of farmed mussels could also result in wider benefits for the environment. In addition to containing high levels of omega-3s, seafood includes a range of vitamins and minerals found in other meat sources, but greenhouse gas emissions per kilogram of edible mussels are a fraction of that from the production of pork, beef or chicken.

Dr. Carboni added: "Harvesting rope-grown mussels does not affect marine biodiversity in the same way as commercial-scale fishing and, as a result, mussels could be a highly nutritious and omega-3-containing protein source for environmentally conscious consumers."

The research paper "Mussel consumption as a 'food first' approach to improve omega-3 status" is published in Nutrients.

Ingredients

1.5 kg mussels
1 fresh spring onion
200 g cherry tomatoes 
extra virgin olive oil
2 tablespoons Tabasco
6 slices of homemade bread
parsley

Preparation

We begin the preparation of the sautéed mussels taking care of cleaning the mussels. Let's scrape them to remove algae residues. We remove the silky filaments pulling them away vigorously towards the top of the mussel. From time to time we place them in a bowl with cold water. We peel the onion and cut it into fairly thin slices. In a large pan add the onion and a little oil. Let it brown over high heat for a few moments. Then add the cherry tomatoes (cut in half) and two tablespoons of Tabasco. Let it always cook over high heat for a few minutes. Then, add a generous handful of chopped parsley, mussels and a cup of water (which will help create moisture inside the pan by opening them all more easily). Cover with a lid and cook them for two – three minutes (always over high heat) shaking the pan from time to time so that the heat reaches evenly to all the mussels. As soon as they begin to open, turn off the heat and sprinkle with a generous handful of chopped parsley. Transfer the mussels and the sauce into a glass (or ceramic) baking dish so that they do not continue cooking with the heat of the pan. Let's dedicate ourselves to the croutons (but I advise you to prepare them in advance so as soon as the mussels have finished cooking you will have them ready.) Cover the bottom of a pan with plenty of extra virgin olive oil. Heat the oil and, as soon as it is hot, brown the slices of bread, a little at a time. Turn them on both sides, until they become golden brown and crispy. Let's transfer them to absorbent paper. We serve the sautéed mussels hot accompanied by fried bread croutons. They will be perfect to collect all the delicious sauce and will make this dish even more delicious and special! They will be mouth-watering!

I am at your disposal for any doubt, question or clarification so do not hesitate to contact me. 😀


Thursday, March 30, 2023

Pan-fried partridge with fried peppers


This Sunday I cooked a dish of game, the partridges with fried peppers. The recipe for an elaborate second course of meat. Are you looking for an alternative to the usual dishes? The protagonist of today's recipe is a meat different from the usual. Partridge is a good dish to include in your diet. Our food choices are not only a matter of survival, they are also choices of responsibility. Not taking into account the quality of the food we eat, increases the risk of incurring certain diseases. It is our body that first suffers the consequences of bad habits. To prevent disease and start eating a healthier diet, follow these tips: they don't require too much effort.

A low quality of food equates, in the end, to a worse quality of health. I therefore recommend limiting it to only once a week. Whenever you need to prepare a sauté or sauté meat, choose olive oil. It is one of the healthiest, most nutritious and, in addition, best withstands high temperatures. 

Ingredients 

1 partridge without skin and bones (about half a kilo)
2 small onions
2 cloves of garlic
5 bay leaves
ground black pepper
2 or 3 potatoes
1 cup white wine (250 ml)
4 cups water (1 l)
2 sprigs of rosemary
1 cup vegetable broth (250 ml)
1 tablespoon salt
partridge and chicken livers (for the sauce)

Preparation

First cut the partridge into pieces, size of the pieces to your taste. Wash them and set aside. Then peel the onions and cut them into thin slices. Keep the skins. Place the onion and meat in a pot with water. Season with chopped garlic, bay leaf, pepper and salt. Do not forget the white wine: pour it into the pot and close with a lid. Continue cooking for 30 minutes. After this time, lower the heat and continue to cook until the cooking liquid is reduced. The fifth part of the initial liquid will be enough. Remove the pieces of partridge, then place them in another container and season with salt and herbs. Bake for 40 minutes at 90°C. Place the peppers and potatoes next to it, but in a separate baking dish, without peeling them. After this time, remove from the oven. Let the potatoes cool and peel them. Prepare a mash without lumps with vegetable broth. To finish, prepare a sauce with which you will season the partridge meat. Use: white wine, salt, chili, onion skin and partridge and chicken livers. Blend everything and season with salt. When serving the meat, heat the sauce with which to accompany your delicious partridge with wine.


Curly lasagna rolls 


A delight for the palate and the eyes, curly lasagna rolls are really the ideal dish to prepare and serve during family lunches. A valid alternative to the classic meat cannelloni, these rolls prepared with eggplant and sausage are really rich in taste and full-bodied. They are prepared quite quickly and lend themselves to being cooked in advance to be then heated before serving, this method means that they can be flavored even more thanks to the rest time, always recommended in the preparation of baked first courses. Many ingredients but that maintain an extraordinary balance between them. So let's see together how to make these delicious lasagna rolls.


Ingredients

8 sheets of curly lasagna
600 grams sausage paste
400 grams fiordilatte
500 milliliters tomato puree
just enough salt
to taste extra virgin olive oil
just enough seed oil
1 handful fennel seeds
1 eggplant
8 slices mortadella
50 grams grated Grana Padano cheese
50 grams onion

Preparation

Wash the eggplant well and reduce it into slices of a thickness of 3 millimeters, then fry them in plenty of hot seed oil and once golden brown well on both sides, drain them and place with salt. In a large pan, brown the chopped onion with a few tablespoons of extra virgin olive oil. As soon as the onion is golden, add the fennel seeds and let them toast for a couple of seconds, then add the sausage paste. In a large pan, brown the chopped onion with a few tablespoons of extra virgin olive oil. As soon as the onion is golden, add the fennel seeds and let them toast for a couple of seconds, then add the sausage paste. Sauté the sausage over high heat and add about 300 milliliters of tomato puree, then cook for about ten minutes. Once the sausage sauce is ready, pour it into a bowl and let it cool. Then add the diced fiordilatte and 40 grams of grated Grana Padano and mix everything. Place a pot on the heat with plenty of water and salt and boil the sheets of curly lasagna for about 8 minutes, then drain and place it on a plane, then start stuffing them with a layer of fried eggplant. Continue to fill the pasta sheets with mortadella and finally with a light layer of sausage and cheese mixture. Roll the sheets on themselves and place the rolls thus obtained in a baking dish. Spread the tomato puree you have kept aside on all the rolls and sprinkle with the grated Grana Padano. Bake for about thirty minutes in a static oven at 200 C degrees. Once ready, let rest for about ten minutes and serve. And here are the curly lasagna rolls ready to serve.


Soup with beans and greens 


The chard and bean soup is an easy and quick first course to prepare. One of the very greedy comfort food that are perfect both cold and hot. Let's see together the ingredients and steps to prepare this delicious recipe. The beans and vegetable soup is an easy, healthy and genuine recipe, very satiating and low in fat.

Delicious this bean soup with the addition of vegetables, a rich and nutritious dish, very protein, light and healthy. The recipe for bean soup is perfect if you are looking for a first course without pasta, a dish of tasty vegetables. Obviously this is a typical winter dish but no one forbids us to prepare it all year round.

It represents a perfect single dish to be enjoyed especially when it is very cold outside and you need an invigorating and very hot food! The beans and vegetable soup, rich in minerals and vitamins, is a real panacea that at least once or twice a week should be proposed on the table! And then it is very easy to prepare, it cooks practically by itself, just enough time to prepare some greens. If prepared in abundance, it keeps well in the refrigerator for two-three days. Let's see the recipe right away.

INGREDIENTS dose for 4 people

1 kg of Swiss Chard
300 g of beans already cooked
1 onion
Extra virgin olive oil to taste
Salt to taste
2 glasses of water

Preparation

To prepare this recipe you start cleaning the chard and after washing them well blanch in a pot full of water for a few minutes. They will have to be cooked, but also crispy. Once this is done, drain and set aside. At this point chop the onion and brown it in a pan with a little extra virgin olive oil until it has become transparent. Afterwards, the chard and drained beans of their preservation liquid are also added. If you want to use dry beans, you must first soak them and then cook them for at least 2 hours. Once the vegetables and legumes are added, add the two glasses of water and cook for 30-40 minutes. Instead of water you can also use a vegetable broth. Add salt and if you want to add a sprinkling of grated cheese and a drizzle of extra virgin olive oil raw. Serve nice and hot even with croutons.


Homemade Pizza


I am Italian and, from all over the world, everyone likes pizza. During the lockdown period we all tried our hand at preparing pizza and then? Is it more convenient to go and eat it in a pizzeria or were your results not satisfactory?

Yes, it seems a simple preparation but there are some fundamental steps for the success of a good pizza. But don't worry, I have prepared this article so you just have to follow directions and steps, use healthy and genuine ingredients, starting from the flour and... You will look forward to inviting friends and relatives to your home to let them enjoy your pizza like in a pizzeria. I would like to have the dough ready in a moment and only more to roll out in the pan, and then the oven... the one at home reaches a maximum temperature of 250 °C while in the pizzeria, in the wood or electric oven, the temperatures are far higher and cooking times halved... Prepare the dough in the morning to eat pizza in the evening at dinner, letting it rise at room temperature.

INGREDIENTS
 
400 g Wheat flour 
100 g Durum wheat flour 
350 ml water
1,5 g Natural brewer's yeast
10 g salt
extra virgin olive oil

GUIDELINES
 
DOUGH PREPARATION
In a large bowl, add the flour and mix well with your hands, so as to oxygenate them, add dry brewer's yeast and mix everything well.
Little by little add the water (it must have a temperature neither too cold, nor too hot, lukewarm, approximately around 20 °C) and knead with your hands always inside the bowl. Continue to add water and close the mass, always kneading inside the bowl, keeping aside a 10% to be used later. Transfer the dough to a work surface, slowly forfeit the remaining water, little by little, kneading by hand for a few minutes (if necessary lightly flour the work surface). The movement to do to knead is always the same: take the dough with both hands, lifting it from the surface, place "feet and then head" of the dough or the two ends of the mass, then take again with both hands in the opposite direction and proceed in the same way. (it's easier to do than to say, watch the video to understand the correct movement) Add a dash of extra virgin olive oil and let it absorb.

REST OF THE DOUGH
Let the dough rest on the work surface, covered with the previously used bowl or a kitchen towel, for at least 30 minutes.
 
CONCLUSION OF THE DOUGH
Remove the bowl or dish towel. Add salt slowly to avoid lumps of salt, and knead always making the same movement. The salt "pulls out" the water from the dough, in fact if you touch the dough is moist, this humidity is good, it goes to make the gelatinization of the mass, which then gives the caramelization of the sugars. The mass is made, it has taken texture and shape.

RISE
Transfer the dough into a container (the one in which we kneaded previously can also be fine) cover with a cloth or kitchen film and let rise at room temperature for at least 6-7 h.

DIVISION OF THE DOUGH
Transfer the dough to a lightly floured work surface and divide into masses, of the same weight or of different weight depending on the size of the baking trays you have available. With this dose you will have to get a classic rectangular baking tray or two round baking trays of about 30 cm. Knead the masses always with the same procedure for a few minutes. Once the "balls" are formed, let them rest covered with cloth for another 30 minutes on the work surface. (If you do not plan to use all the masses you can put a part of it in the refrigerator, in a closed container, for up to 2 days.)

LAYING OF THE DOUGH
Flour the work surface abundantly with durum wheat flour (this flour is more grainy and greatly facilitates the spreading of the dough) take the dough and enlarge it with your hands; with your fingers press on the entire edge of the dough (this step is necessary only if you use the rectangular pan, if you form small round pizzas instead no.) Always with your hands, and never with a rolling pin, spread the dough slowly making it rotate slightly to facilitate the procedure. Grease the baking tray with a drop of oil (you need very little oil). Take the dough on one side, place it on the palm of your hand, take the other end of the dough and place it on the forearm, in this way it will be easy to support it and position yourself on top of the pan because the dough is well supported: place the dough on the pan and widen again until it covers it completely, with one hand hold the dough still and with the other stretch with gentle movements. Lightly grease the surface of the dough with extra virgin olive oil (not too much because otherwise it will burn during cooking) including the edges.

COOKING
Preheat the oven to the maximum temperature (usually the oven at home reaches 250 °C) and meanwhile let the dough rest in the pan.
The pizza, in a pizzeria where the oven reaches much higher temperatures, cooks in just a few minutes and therefore the pizza maker seasons it with all the necessary ingredients; At home, on the other hand, cooking times are longer and it is necessary to season several times. To obtain the classic red pizza it is necessary to cover the pasta with tomato puree (without oregano because otherwise it burns during cooking), to obtain the white pizza we do not add anything but we bake it like this, with only a drizzle of oil on the surface.

BAKE ON THE BOTTOM OF THE OVEN (or on the lowest floor) FOR 10-15 MINUTES, after 10 minutes it is necessary to check because cooking depends a lot on the oven and the thickness of the dough.

BUBBLES FORM, THE PASTE GROWS AND TAKES COLOR.

TAKE OUT OF THE OVEN AND SEASON with cheeses, vegetables, cherry tomatoes and everything that comes to mind and you have available according to your tastes.

BAKE AGAIN IN THE UPPER PART OF THE OVEN FOR ANOTHER 5 MINUTES until the condiments are cooked. Remove from the oven, add the oregano and serve.

Sometimes a simple antipasto is all you need. Salute 🍷


Quick appetizers are ideal when you have little time available, but you do not want to give up an appetizer to start a lunch or dinner. The Coronavirus has upset our lives in every area, family social work and with all these regulations that Prime Minister Trudeau has dictated or at least tried to set rules of behavior often badly digested by Canadians. I certainly do not want to start a political discourse I simply can not see my life out of the context that I live every day!

Returning to the kitchen I have combined a recipe to prepare quick and easy appetizer that can be prepared quite quickly and that will surely make a good impression on the table of the Easter holidays and for every event that we are interested in celebrating with the family! Appetizers are an integral part of a menu and it is the course that I absolutely prefer on the blog of recipes of appetizer ideas there are so many, many recipes of quick appetizers easy without cooking and other recipes of easy appetizers without the use of the oven.

Platter of mixed appetizers... or small ideas to bloom waiting for the main course, very simple and quick preparations (apart from the peppers that require 15 minutes of cooking about the other appetizers are very hasty) to be served on the table even during the spring that in a single day has already arrived at beautiful tough temperatures! 

What to invent for Easter appetizers? When you start thinking about the menu of that day, it is normal to dwell on the very first course, on the food that officially kicks off the Easter lunch. 

Ingredients

Toasted bread to taste
Tomatoes to taste
Artichokes to taste
Salami to taste
Provolone cheese to taste
Garlic  to taste
Basil  to taste
Extra virgin olive oil  to taste
salt and pepper  to taste

Preparation

The preparation is extremely simple and fast. Meanwhile, add the other vegetables all together and, if you deem it necessary, further chop the products in oil. Raw meat and artichokes in oil. For lovers of the genre, this combination will be very successful indeed. Being an Easter appetizer poor in ingredients, it is essential to focus on their quality. The salami slice that lends itself to being eaten raw, goes perfectly with artichokes in olive oil. Their sweet taste will enhance the freshness of the meat, especially because they are artichokes processed naturally and only after careful selection. 

If you want to play rebound, between the platter of cold cuts and that of cheeses, here are the ideal combinations: very fine ground salami with a sweet and delicate flavor, is excellent with Parmigiano Reggiano. The cup requires a fresh, lightly smoked cheese, such as provolone. The raw prosciutto goes well with Robiola if sweet, or with provolone or melted cheese. Bresaola is excellent with buffalo mozzarella and goat cheese. Mortadella goes well with a fatty and medium-aromatic cheese, such as a semi-aged pecorino, or with mozzarella. The cooked prosciutto instead goes with a slightly spicy blue cheese, or with Asiago, Fontina cheese, robiola and ricotta cheese. With bacon and lard, finally, no delay: gorgonzola.


Creamy tagliatelle with mushrooms 


The creamy tagliatelle with mushrooms are a very simple first course to prepare, of sure effect but above all very good, also ideal for holidays. Here is the recipe. The creamy tagliatelle with mushrooms are an extremely simple first course to prepare but that looks great, it will be very appetizing, tasty and with a really irresistible creaminess.

It is a perfect dish when the mushrooms are fresh in season and present in many varieties. In this case I used dry porcini mushrooms but you can choose the variety of mushrooms you prefer. Let's see, then, together how to prepare excellent creamy tagliatelle with mushrooms and some tips for really amazing variations.

Creamy tagliatelle with mushrooms, a first course very simple to prepare and appetizing. Perfect to serve on any occasion. Today I propose a very quick first to prepare. Ideal to serve to your guests who will be amazed by their creaminess. The creamy tagliatelle with porcini mushrooms are a very tasty first course, a real delicacy for fans of this mushroom. Fresh pasta tagliatelle are the ideal format to wrap in a delicious cream without the addition of cream. Do not miss this special dish that is prepared in a few minutes and is perfect to enjoy for a family lunch or in the company of your friends, on every occasion success is assured.

Fresh pasta tagliatelle are the ideal format to wrap in a delicious cream with the addition of cream. Do not miss this special dish that is prepared in a few minutes and is perfect to enjoy for a family lunch or in the company of your friends, on every occasion success is assured.

Ingredients

400 g tagliatelle
400 g Porcini mushrooms (or other mushrooms to taste)
1 clove of garlic
extra virgin olive oil to taste
salt to taste
pepper to taste
250 ml cream
Grana Padano to taste
parsley to taste

Preparation

To start the preparation of creamy tagliatelle with mushrooms you have to start from the base, or from the realization of the mushroom cream. First of all, dedicate yourself to the mushrooms, which will be washed thoroughly so as to eliminate the earthy residues on their surface and reduced to slices. Take a large non-stick pan, add oil and brown the garlic, which you can leave whole so as to remove it when the mushrooms are cooked. When the garlic begins to brown you can also add the slices of mushrooms, season with salt and pepper and continue cooking until your mushrooms are ready. At this point, divide the amount of mushrooms into two halves. One half will be put inside a mixer together with the cooking cream. Mix everything well until you have obtained a thick cream, which you will have to add again in the pan together with the mushrooms that you have kept aside. Let it go on the fire for a few more minutes and add the grated cheese, mixing everything. Separately in a large pot, bring plenty of salted water to a boil and start cooking the tagliatelle. Drain al dente and pour them into a pan together with the sauce. Sauté everything for a few minutes and finish with chopped fresh parsley. Your creamy mushroom noodles are then ready to be served to your guests when they are still hot.

Alternatively you can prepare a pasta alla boscaiola or tagliolini with pesto.

Preservation
The creamy tagliatelle with mushrooms should be eaten hot, immediately after being prepared, so as to be able to better appreciate the creaminess.

Tip
You can use instead of grated Grana Padano a more seasoned cheese with a more intense flavor or you can decide to make your cream even more velvety by adding Gorgonzola or Stracchino cheese. Use the types of mushrooms you prefer or also add dried porcini mushrooms, which you will have to soak in cold water and then add to the sauce.


Wednesday, March 29, 2023

Cannelloni ricotta & spinach 


What makes cannelloni ricotta and spinach such an irresistible first course? Their genuine simplicity? The balance between fresh homemade pasta and soft filling? The golden crust of delicious béchamel? Or maybe their smell of home, Sunday lunch as it once was?  Cannelloni ricotta and spinach are a classic first course perfect for any occasion, also ideal for vegetarian friends. Cannelloni ricotta and spinach are a perfect vegetarian first course for any occasion and also ideal for friends who do not eat meat and fish. 

Obviously it is a variant of the classic cannelloni meat and are perfect to prepare for lunch. They are very quick to make and above all you can prepare them in advance, cook them and freeze them. For this recipe of cannelloni ricotta and spinach I decided to use dry pasta because it is very practical and fast, in fact I just have to prepare the filling, stuff the cannelloni and bake them in the oven. For perfect cooking I suggest you abound with tomato sauce, especially in the corners: in this way the cannelloni will be creamy and tasty. 

But, if you prefer an even richer dish, you can also add the béchamel sauce. In the filling I decided to add a mozzarella cut into very small cubes that will make the filling stringy and even more delicious! Let's see together how to prepare them!


Ingredients

500 g ricotta
500 g spinach cooked and chopped
20 cannelloni
500 g tomato sauce
100 g mozzarella diced
100 g grated cheese
nutmeg
Pepper

Preparation

First, in a large bowl, we start by working with a fork the fresh ricotta. We add the previously cooked and chopped spinach to the knife. Mix everything well and add salt, nutmeg and pepper. Finally, add the grated cheese and the mozzarella cut into very small cubes. We take an aluminum pan of 8 portions and make a first layer of tomato sauce. With the help of a teaspoon or a piping bag we fill all the cannelloni with our ricotta and spinach filling. Once we have placed all the cannelloni well we just have to season them. Let's cover them well with plenty of tomato sauce. Finally add plenty of grated Parmesan cheese and bake in a ventilated oven at 180 °C for 35 minutes, or in a static oven at 190 °C for 35 minutes. Once our cannelloni are cooked, let them cool for 5 minutes and they are ready to be served! 
Enjoy your meal!


Spaghetti with mussels, olive oil, garlic and parsley 😍😍 


Spaghetti with mussels are a tasty and fragrant first course of seafood, among the most loved by Italians together with spaghetti with clams. It is a symbolic recipe of our gastronomic tradition, perfect for celebrating the Christmas holidays together with friends and relatives, but not only. Simple and quick to make, it is essential to use high quality raw materials: the mussels must be very fresh, they must be cleaned with great care and finally soaked in water and salt to eliminate any trace of sand.

Once well rinsed, these should be opened over high heat in a pan with a base of oil and garlic; In our pasta with mussels we decided to add fresh datterini that, sautéed quickly, will wrap spaghetti or any other shape of pasta with the sauce released. The final addition of fresh parsley will give great aroma and a lively and bright color to the dish. There are many variations of spaghetti with Neapolitan mussels: you can also enjoy them in white, without cherry tomatoes, or you can enrich the sauce with a pinch of pepper, black olives and anchovy fillets in oil. If you want to make the dish even richer, I advise you to add clams or fresh scampi. An extra finishing touch? Serve your spaghetti with chopped pistachios or grated lemon zest: it will give a pleasant freshness to the dish.

Ingredients

SPAGHETTI 200 gr
MUSSELS 600 gr
CHERRY TOMATOES 150 gr
GARLIC 2 segments
CHOPPED PARSLEY to taste
EXTRA VIRGIN OLIVE OIL to taste
SALT to taste
CHILI POWDER to taste

Preparation

Clean the mussels thoroughly and let them soak with water and salt for about 30 minutes. After this time, rinse them well. In a large pan, brown a clove of garlic with a little oil; Add the mussels. Cook over high heat, until the shells have opened. Shell the mussels keeping some with the shell for the final decoration. Strain the cooking stock and keep it aside. In the same pan, brown the second clove of garlic with a drizzle of oil; Add the cherry tomatoes, cut in half. Season with salt and cook for 10 minutes. Add the mussels and their cooking liquid. Boil the spaghetti in boiling and lightly salted water, then drain them al dente and pour them into a pan with the sauce. Finish cooking in a pan by adding a ladle of spaghetti cooking water, if necessary. Scented with chopped parsley and a pinch of chili powder. Serve the spaghetti hot.

Preservation
Spaghetti with mussels should be eaten hot and freshly ready. Alternatively, you can store them in an airtight container in the refrigerator for up to 1 day.


Scialatielli with clams


Scialatielli are a format of fresh long pasta typical of Campania cuisine, in the shape of large spaghetti but shorter, traditionally prepared by hand but can also be purchased in supermarkets. The basic dough of this fresh pasta is eggless and is made with durum wheat semolina, water and a pinch of salt. It can be enriched with the addition of special ingredients such as vegetables, spices or aromas that give life to imaginative colored pastes. In general, fresh pasta takes less time to cook than dry pasta, the only precaution will be to prevent it from sticking during cooking, adding a tablespoon of extra virgin olive oil to the pot with water. For the realization of this recipe, shellfish such as mussels and clams are ideal, as well as being very tasty, they are generally low in calories and also rich in protein.

It's been quite some time that I want to knead the scialatielli following the original recipe and today free from work commitments, I put myself in good spirits and I prepared these scialatielli with clams. I spend just a few words on this shape of pasta of recent birth, in fact they see the light for the first time at the hands of chef Enrico Cosentino who creates this pasta "almost" egg not in a seaside place as easily could be considered since the preponderant use is to season them with seafood or fish sauces but in S. Giovanni in bloom a very pretty village of the Sila. The scialatielli make good with many sauces and in particular with those based on porcini mushrooms, that are of excellent quality and widespread on the territories of the vast Sila plateau. The scialatielli with clams respect the classic dimensions in the shape of the pasta, they are 10 cm long and 1 cm wide, but what most characterizes them is the rather high thickness of 3 – 4 mm that makes them consistent during chewing. Even the dough of scialatielli is particular, the amount of egg is very small, a couple of eggs are used on 500 g of flour compared to the five present in the classic tagliatelle. 

To prepare them I use flour with the addition of a maximum of 10% semolina and to knead I do not use water but milk and a little olive oil. Everything is then flavored with grated pecorino cheese, chopped basil leaves and completed with a pinch of salt. The seasoning sauce of these scialatielli with clams is identical to what I prepare for spaghetti with clams in white. The important thing is to have clams available that are required to purge in salt. Keep them immersed at room temperature in a brine of water and salt to 30% for half a day in order to be sure that any sandy residues are expelled in time, allowing us to eat them without annoying crunches. For the rest, boil the scialatielli in moderately salted water for 5 minutes and then sauté them with the clams, completing after serving with a grating of lemon peel if desired.

To prepare scialatielli with clams and cherry tomatoes, you need

Ingredients

350 g Scialatielli
1 kg Clams
2 cloves Garlic
1 bunch Parsley
Salt
6 tablespoons Extra virgin olive oil
1 glass White wine
Chili pepper
7-8 cherry tomatoes

Preparation

Put the clams already purged in a pan with 2 tablespoons of extra virgin olive oil, a clove of crushed garlic and a little chopped parsley, cover and open the shellfish over high heat, shaking the pan occasionally. Remove the clams left closed and detach the shellfish from the valves, keeping aside some whole clams, then filter the cooking liquid. {Alternatively, to purge them, carefully wash the clams under running water and place them in a container with cold water for at least 3 hours, then proceed with the cooking indicated above}. In a pan, pour the extra virgin olive oil and the remaining garlic making it brown, then add the chili, the tomatoes deprived of the skin and seeds and cut in half, the clams with their cooking liquid and finally deglaze with a glass of white wine. Add a pinch of salt and continue cooking for a few minutes. In a pot with boiling salted water, cook the scialatielli al dente, drain, put them in the pan with clams and cherry tomatoes and mix everything. Add the remaining parsley and sauté over high heat, over high heat, for one minute. Transfer the scialatielli with clams and cherry tomatoes to the plates and decorate with the whole clams kept aside. Serve the scialatielli with clams and cherry tomatoes still hot.

Bon appétit and... until the next recipe!


Sandwich with sausage and bell peppers 


So much taste enclosed in this sandwich with sausage and peppers! Often you do not have the time or the desire to prepare a complete meal, but this does not mean that you have to give up eating something really good: when this happens, I prepare a sandwich and always satisfy myself. Then put the beer in the refrigerator and start to prepare this colossal panino! The sausage and pepper sandwich is really greedy, a finger food that in southern Italy is eaten on the street like a pizza by the slice to say. I really prefer to make them myself, genuine and greedy.

The sandwich, the night sandwich. The one that fixes your stomach after an evening a little too long, except that its ingredients are grilled sausage, peppers and onion. Even better if accompanied by some sauce. Yet it is so good that its name does not scare anyone, not even the most refined young ladies! But you don't have to wait for the weekend to enjoy it in front of the van on duty. Today I will give you some suggestions to prepare a perfect sandwich at home!


Ingredients

4 Sandwiches (choose the type of bread you like)
1 red bell pepper
1 Yellow bell pepper
1 red onion
500 g Spicy sausage
4 tablespoons Extra virgin olive oil
Salt

Preparation

Wash the peppers, remove the stalk, cut them in two lengthwise, remove the internal filaments and cut them into strips about two centimeters wide. In a large pan insert four tablespoons of oil, heat and add the onion cut into slices not too thin and the sliced peppers, also insert the sausages after you have pierced them with a toothpick, so that they do not pulp during cooking, let it cook over high heat for about fifteen minutes, stirring occasionally. Salt everything and open the sausages in two along their entire length, so they will flavor the peppers. Finish cooking for another fifteen minutes. When cooked, remove from the pan all the contents except the oil left on the bottom, cut the sandwiches into a book and put them to heat in the pan, on the side of the crumb, for a few minutes, then remove them and stuff each sandwich with sausage and peppers. Eat them hot: they are delicious!

Notes
If you want to prepare these sandwiches for children you can replace the spicy sausages with turkey sausages, so the taste of the sandwiches will be much more delicate. If you like sandwiches and want to prepare a delicious one, but with a truly unsurpassed flavor, I suggest you enjoy the gourmet sandwich with asparagus, egg and parmesan flakes.


Pasta alla boscaiola If you want a first course with an autumn flavor, pasta alla boscaiola is the one for you, let yourself be enveloped by...